Date: Revised – August 20, 2016
Bird photography is quite unique and would be challenging to learn in a day. If you’re here as you’d like to improve your skills then I surely hope my experiences will further enhance yours. I’ve spent many hundreds of hours honing these skills and they come from continuous trial and experimentation, exploitation of camera gear and knowing the surroundings along with subject matter. I share these tips so that you may try them on your own and obtain your own decisions. These are the rules I abide by when in the field but may not work for everyone.
Many have written and asked from around the world if I can share photography tips on how to best photograph birds. This of course is a broad based question as each scenario offers different lighting, different species and what camera gear you have accessible to you. Some bird species are easy subjects such as geese or ducks in a pond vs. a wood warbler which are constantly moving and hopping from branch to branch with only momentary lapses in between. This can be quite challenging. That’s not to mention constant lighting changes, obstacles such as branches, other birds and the luminous color of the wood warblers.
It’s imperative to know as intimately as possible the outer limits and capabilities of your camera and your lens(es) of choice. What you choose and how to use them in Bird Photography will make the difference of turning average photos into great photos. A few examples of this are understanding how to control your Exposure on a whim, working your camera’s ISO settings as needed, whether or not your lens has image stabilization and your ability to handhold your lens by limiting body movement. We can add more complexity if you choose to use a monopod or tripod and your choice of shutter speed. If I’m using the Canon 500mm I will confess due to its bulkiness, I have found after much experimentation (and injury) that the monopod (or tripod) is the way to go. After much contemplation I chose the Gitzo 3551 monopod. Others will debate this and use a tripod with a Gimbal head. Again, all personal choice but I would say to sample both a tripod and monopod or carry your gear handheld prior to determine what best suits your needs. This would be from a physical standpoint (your strength and endurance) and as a photographic necessity to obtain your objective.
Basic tips for new birding photographers: If you plan your journey in advance that may be of help so you know what to expect from several aspects. Being familiar with the terrain you plan to visit may help. On this site for example, the section entitled: Local Birding Spots offers photos, trail assistance and also in some cases species tracked and logged. A trail map is also of consideration as some of these places can be quite remote here in southern California. Quite a few of our trails house Mountain Lions and Rattlesnakes. If your trail is an actual OC Park listed trail (which is maintained and owned by OC Parks) then their site offers actual trail maps. Plan the time of day you plan to shoot as even lighting is best vs. a bright sunny mid afternoon. A further example is glaring sun on a beach when shooting shorebirds. This can be quite challenging especially with birds in flight and obtaining their natural color and field markings. If this is your destination, you’d best avoid mid day sun and plan on early morning or late afternoon provided of course your schedule permits. An immediate exception to this rule is a rare bird sighting..then just get there as fast as you can!
Here’s an example of the gear I might choose for a field hike lasting more than say 2-3 hours.
- Canon EOS series body (a good choice is the EOS 7D Mark II)
- Canon zoom lens such as the 100-400 or a lower cost prime lens such as the 400mm 5.6 L
- Canon 1.4 teleconverter / extender for additional reach if necessary.
- Minox binoculars such as the Minox 10 x 52. These offer excellent optics by having wider diameter (52mm) to allow more light in early morning or late afternoon along with a magnification of 10x. Should you have any interest in binoculars, scopes or other optical gear, we are an authorized Minox Dealer and can drop ship to your door.
Personally, if you are going to choose only one lens, I wouldn’t recommend anything shorter than a 400mm focal distance lens though a Canon 300mm with a 1.4 extender offering 420mm is a rather good choice as well. The reason I mention this as the more you crop your photos the greater the chance of image degradation if trying top obtain optimum quality. Since birds are not typically at close range, this would be the case. Image quality may suffer further especially with higher ISO’s.
Ok, let’s discuss Camera Settings:
- Auto ISO – (with exceptions as later noted) – you’ve got too much to worry about and the camera knows how to determine the right choice based on dynamic lighting scenarios. I would only use a static ISO setting when you’re lighting isn’t going to change or say your shooting landscape photos as some examples. One other possible exception as with cropped sensors such as the Canon EOS 7D, Canon Rebel, etc typically anything past 800 ISO can result in image noise. Be sure you’re aware of what type of image sensor your camera offers: cropped or full frame. Full frame is the equivalent of true 35mm film, cropped sensors are not. They actually capture less information on the image sensor. Camera manufacturers depending on model will inform you of the sensor type. Here’s an article that explains cropped vs. full frame sensors – I’ve used both. The image quality (IQ) on any full frame camera when cropped “to equal” what was photographed on say the Canon 7D had less noise and was easily the winner with respect to Image Quality. The Canon EOS 7D Mark II is considerably better than the Canon EOS 7D Mark I though again a steeper price tag than the now outdated 7D Mark I. I know of a few bird photographers who insist on the 1.6 cropped advantage. Once you step off the cropped sensor to a full frame sensor you will see the difference by comparison especially in higher ISO images.
- Shutter speed – choose 1/400th or higher – 3 reasons why:
- Though your species may be stationary at the moment, that scenario can change in a split second. A faster shutter speed will have you prepared to capture an instant in flight shot with a reasonably good success rate and minimize blur if properly focused.
- The second reason is your shutter speed should be faster than your camera’s focal length. If your using the same 400mm as I am, then 1/500th would be your slowest shutter choosing. Again there are exceptions with IS (Canon) or VR (Nikon) set to “on”, you can shoot under the focal length but with a bird in flight, their fast motion more than likely may not be enough to acquire a sharp, clean image.
- Third: run personal tests. Try your scenario in advance before heading on your journey. When I first acquired the Canon 400mm I wanted to know my hit rate when hand holding this lens without IS / VR. I ran test shots at: 1/1600, 1/1250, 1/1000, 1/800, 1/640 and 1/500 of hummingbirds. I was unable to consistently obtain sharp images under 1/640th. It’s important to know your personal limitations (strength, endurance, body shake, etc.) as this will determine how slow you can shoot reliably. In case you get into a low light situation the need to reduce your shutter speed to allow more light in your camera (or zoom out if a zoom lens) will be your options to allow more light. I might note since there was plenty of late afternoon daylight, I’ve several hummingbird shots at 1/6400 (yes, 1/6400) were remarkable (some cameras such as the Rebel however are limited to 1/3200 shutter speed).
- Exception to using Shutter Priority:
- If you have two subjects at fairly close range that are not in a horizontal straight line (not equidistant) such as a male and female duck, only one of the subjects will be in focus. I would suggest Manual Mode to allow for a smaller Aperture such as F8 to F13 if you want to be at close range, with Auto ISO adjust your shutter speed accordingly to the camera’s light meter. Or simply move further away.
- If a subject is facing you, not to its side and at close range. This reason for this is the Depth of Field is too narrow this will also create a “Bokeh” effect. Easy solution is to move further away. Conversely, many of us use this “Bokeh” technique (widest aperture) to put more concentration on the subject by blurring out the foreground and background.
Here’s an example: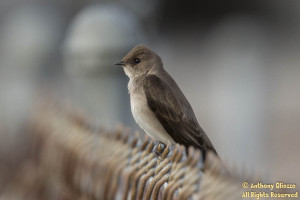
Northern Rough-winged Swallow (21779) This is typically achieved in Av (aperture mode) or Manual Mode. Moral of the story: Don’t be afraid to explore your gear. Most photo programs offer EXIF data (search Help menu within your photo app to display this information about your image. EXIF (Exchangeable Image File) info tells you the settings you chose to take a particular photo. There’s no longer a need to take notes on your trial and errors.
- Exposure – perhaps one of the most important aspects here is exposure primarily for in flight sky shots. This can enhance or degrade a potentially great image. Depending on your lighting of course, over exposing can be key if using RAW (Canon=CR2 / Nikon=NEF files types). Recovering dark or shadowed areas on a bird can create additional unwanted noise. Testing is encouraged so you get the results you want. If I’m shooting in flight shots (depending on sky light and subject), I’m typically over exposing by 1 full stop and as high as 3 full stops. I’ve might also switch from Evaluative Metering to Partial or Spot Metering if back lit which has saved the day. Also, time permitting, I’ll quickly review the image and look at the histogram to give me pointers as well as on camera zooming during playback. Unfortunately many cameras do not have exposure compensation (EC) in M (manual Mode) including such higher end cameras as the Canon 5D Mark III. If this is your scenario, I might recommend shooting in Tv or “shutter priority mode” which should enable adjusting your Exposure Compensation manually as mentioned or again try Spot Metering or Partial Metering which adjust the Exposure according to the subject in center. Stay away from any Automatic Program modes. This is where you let the camera choose the shutter speed, exposure, etc.
- Aperture – (some of this section is repetitive as in Shutter section) though its important to consider, it weighs less importance than obtaining the correct shutter speed in my opinion. There are exceptions where Aperture would be a priority choice such as obtaining a male and female in the same photo whose depth of field is not exactly lateral. Also, if you tend to walk up too close on a subject or are just outside the minimum focus distance (MFD) the DOF (depth of field) might be razor thin (too narrow) where only the subject’s eye is in focus. An example of this would be if the subject is facing you. Detail of feathers and other key markings beyond the facial area will dissipate quickly. Best to choose a narrower Aperture again such as F8-F13 light permitting as well. If the bird is faced sideways then this will have little impact as most if not all of your subject should be in focus. Still Shutter priority is typically my primary choice as its all about in focus bird images. If you’re unfamiliar with this concept I would advise understanding Depth of Field. Here’s an excellent web site offering how to calculate the Depth of Field from where your standing and where your subject is located – the Depth of Field Calculator . Being right on top of or closer to a bird is not always beneficial. Always keep this in mind especially when in shutter priority mode as the camera select can select a wider aperture automatically.
- RAW vs. JPG – if your camera offers RAW then this is the choice that you want to make when post processing your images. Recovering highlights and dark shadowy areas is far more beneficial than JPG. I won’t spend the time explaining this here but would encourage you to read on this further. There are numerous articles online explaining the difference provided your camera offers both options. In short, a RAW file is your Digital Negative and JPG is a like a print of your negative. You can’t undo what’s been burned into a JPG (your printed image) but you can surely revert all settings back on your original RAW file (Digital Negative.). Remember you can tweak your RAW file images numerous ways and “Export” your finished view to a JPG without altering the original RAW file. The RAW file never changes just like an original film negative.
- sRGB vs. Adobe RGB (optional) – these are color profiles much like if you were to go to Home Depot and look in the paint section your likely to find a Pantone color chart. Think of these two choices in this sense. I choose Adobe RGB as this palette offers a slightly larger color scale and its rather easy to choose Adobe RGB as my color profile for the monitor I use and also the color printer. This way I know what I see in the camera is also exact on my screen and exact on my prints. If your camera has this feature, consider changing to Adobe RGB. Do the same for your monitor and printer.
- Servo Mode vs. One Shot – when birds are moving your camera will perform better and have a higher success rate if you choose Servo mode. Conversely, if the bird is stationary be sure to revert back as your camera may continue to search endlessly and you may find yourself unable to obtain a sharp image. Some may find the Canon AI Focus mode as a happy compromise when you unable to determine how your subject will react. its not perfect but a good solution if you want the best of both worlds.
- Picture Styles (Canon users) – I’ve ran several tests and have found the default Picture Style called “Standard” is not an optimum true choice for color reproduction. I photographed a black T-Shirt outdoors as a test during daylight and noticed a purplish cast. Several hours later I discovered by switching to Faithful mode produced the truest colors and black was black. The processing of bird images should remain as exact as possible. The slightest color change could get one to think you’ve shot a completely different bird or perhaps you photographed a female Common Yellowthroat but you might believe its a Nashville Warbler. Avoid over saturating your bird photos in post processing.
- AF Points – many photographers like to recompose and use a single focus point for all of their bird shots. If you are unfamiliar, recomposing is when you lock on focus then sway your camera to frame the subject as you see fit. I usually avoid this technique when possible as there’s a greater chance of losing focus for starters. If your camera offers multiple focus points such as the Canon 5D Mark III I have found in Single Point AF mode, that I would prefer to maneuver the focus point the camera where via the view finder where the focus poto fvs. me moving the camera to frame. Sure it takes an extra second but once your practice this process you’ll then have the choice of recomposing OR moving your single AF Point. Not every scene calls for having a center focus point. Additionally, if your camera offers AF selection choices such as Canon’s Single Point AF, AF Point Expansion and Zone AF, you may be best served knowing and trying each of these modes. Personally I only use Single Point AF (manual one point of focus) when the bird is stationary and I can focus on its eye. I prefer to choose AF Point Expansion for small birds in flight and Zone AF for larger birds in flight though in some cases when there’s no contrast and the camera is hunting in a bare sky for your subject, 61 point Point Automatic Selection (provided the lens supports this) will find the bird quickly. As you can see, knowing your lens and camera’s capabilities will improve your rate of success. Here’s a helpful link explaining more about AF Points and AF Modes
- White Balance – in most cases this can be left on AWB (Automatic White Balance). If shooting in RAW (not fixable in JPG without a lot of effort), this can be very useful in Post Processing with programs such as Adobe Lightroom. An example of this is a late afternoon shot of a bird in the sky or an in the shade photo. I have found AWB doesn’t always work and adds too “cold” or a bluish appearance. This can be fixed on the fly by changing the AWB setting in LightRoom to Auto or Daylight.

If you wish to add additional suggestions to this section by all means please use the Contact Form and drop me a note.